rss

Friday, October 29, 2010

How To Create Disable Text Area

This grays out the textarea altogether and inhibits any change in the text as well as text highlighting.If you want to create disable text area use the code below.
<textarea cols="50" rows="5" disabled="yes">TYPE-YOUR-TEXT-HERE</textarea>
Look at the example below.
<textarea cols="50" rows="5" disabled="yes">Computer operating speed is of concern to almost everyone. In a recent series of tests PC SPY identified several programs that were responsible for the biggest cause of system performance slow downs.</textarea>
Result:


That's it.


Adding Meta Tags To Blogger(Blogspot)


Login To Blogger Go To > Design > Edit HTML.

and mark the tick box "Expand Widget Templates"

Then, find (CTRL+F) this code in the template.


<b:include data='blog' name='all-head-content'/>
Now place the following code just after it
<meta content='DESCRIPTION HERE' name='description'/>
<meta content='KEYWORDS HERE' name='keywords'/>
<meta content='AUTHOR NAME HERE' name='author'/>
Now just change text in red with your own text. ‘Keywords’ meta tag can have any number of keywords.
and save the changes.


Thursday, October 28, 2010

How to add Different Meta tags to Different Blogger Posts


Login To Blogger Go To > Design > Edit HTML.

and mark the tick box "Expand Widget Templates"

Then, find (CTRL+F) this code in the template.


<b:include data='blog' name='all-head-content'/>
and add this code just below that line
<b:if cond='data:blog.url == "YOUR POST URL"'>
<meta content='DESCRIPTION' name='description'/>
<meta content='KEYWORDS' name='keywords'/> </b:if>
Then, just change text in blue with your own text.

Now, what you have to do is pasting the above three lines below the present code and changing the link,description and keywords.
You can add different meta tags to as many blog posts as you can.


Wednesday, October 27, 2010

How To SEO Optimize Your Blogger Blog Titles For Higher Search Results


This is called "Blogger/blogspot Title Swapping".This will give your blog better search engine rankings. It is always good to have your main keywords(Post title) of a specific blog post at the start rather than placing your blog title at the start. This situation becomes very bad if your blog title is very long.

As usual,Login To Blogger Go To > Design > Edit HTML.

and mark the tick box "Expand Widget Templates"

Then, find (CTRL+F) this code in the template.


<title><data:blog.title/></title>
Now, replace that line with these:
<b:if cond='data:blog.pageType == "item"'>
<title><data:blog.pageName/> |<data:blog.title/></title>
<b:else/>
<title><data:blog.pageTitle/></title> </b:if>
Now click save the Template and you are done.


Tuesday, October 26, 2010

Adding FaceBook Share Count button for blogger posts.

Adding a Facebook share count button will show a neat count of how many times your blog post has been shared on Facebook.

Facebook Share Button Style  1

Code
<div style="float:left;padding:4px;">
<a expr:share_url='data:post.url' name='fb_share' rel='nofollow' type='button_count'/>
<script type="text/javascript" src="http://static.ak.fbcdn.net/connect.php/js/FB.Share"/>
</div>
Facebook Share Button Style 2

 Code
<div style="float:right;padding:4px;">
<a expr:share_url='data:post.url' name='fb_share' rel='nofollow' type='button_count'/>
<script type="text/javascript" src="http://static.ak.fbcdn.net/connect.php/js/FB.Share"/>
</div>
Facebook Share Button Style 3

Code
<div style="float:left;padding:4px;">
<a expr:share_url='data:post.url' name='fb_share' rel='nofollow' type='box_count'/>
<script type="text/javascript" src="http://static.ak.fbcdn.net/connect.php/js/FB.Share"/>
</div>
Facebook Share Button Style 4

Code
<div style="float:right;padding:4px;">
<a expr:share_url='data:post.url' name='fb_share' rel='nofollow' type='box_count'/>
<script type="text/javascript" src="http://static.ak.fbcdn.net/connect.php/js/FB.Share"/>
</div>
Select one of the Share Button Styles and copy the Corresponding Code.
Login To Blogger Go To > Design > Edit HTML.
and mark the tick box "Expand Widget Templates"
Now find (CTRL+F) this code in the template.
<div class='post-header-line-1'/>
And immediately After it, place Facebook share button code(that you copied) :
If you were unable to find this code in your template,then look for this code in the template.
<data:post.body/>
And immediately Before it, Facebook share button code(that you copied):
Now click Save Template.


Thursday, October 21, 2010

How to Remove and Hide Blogger NavBar


Login To Blogger Go To > Design > Edit HTML.

and mark the tick box "Expand Widget Templates"

Now find (CTRL+F) this code in the template.

]]></b:skin>
And immediately Before it, paste this code:

#navbar-iframe {
height:0px;
visibility:hidden;
display:none
}
Now click Save Template.


Tuesday, October 19, 2010

How to Create Static Pages in Blogger

Pages lets you publish static information on stand-alone pages linked from your blog.For example you can create Contact Us page to your blog that contains the information on how to contact you, Advertise here page to let advertisers know the price and other requirement to advertise on your blog and so on.

So how to create Pages on Blogger? Here’s the brief tutorial below.


 Login To Blogger Go To > Posting > Edit Pages.
Click on 'New Page' button.


Now, give your page a title and write the content and publish the page.
You may need the link of the page.For that Right click the View Page link and Copy the Page link.


After you complete the above easy steps then you are done with creating the Static Pages in blogger.


Monday, October 18, 2010

How to upload Blogger XML templates


  • Download your favorite Blogger XML template to your computer. If the template is contained in a zip file, ensure you have extracted the XML template.
  • Log in to your Blogger dashboard and go to Design> Edit HTML

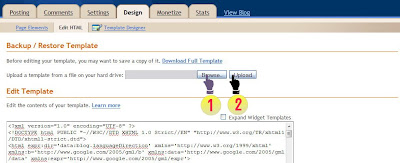
 It’s best that your backup your old template (just in case any thing goes wrong), by clicking on the “Download Full Template” link and then save the file to your hard disk drive.


Once you have created a back up, upload the new template by clicking the ‘Browse’ button (1). Select the file’s source and click ‘Upload’ (2),

After the upload is complete , you can either which to preview your template or click on the ‘Save Template’ button to start using it.


Animated Flash Tag/Label Cloud For Blogger


Installing Blogumus in your Blogger layout is surprisingly simple! You should only need to copy and paste a section of code to your Blogger template. :)

Login To Blogger Go To > Design > Edit HTML.

and mark the tick box "Expand Widget Templates"

Now find (CTRL+F) this code in the template

<b:section class='sidebar' id='sidebar' preferred='yes'>

And immediately after this code line, paste this code in new line:
<b:widget id='Label99' locked='false' title='Labels' type='Label'>
<b:includable id='main'>
<b:if cond='data:title'>
<h2><data:title/></h2>
</b:if>
<div class='widget-content'>
<script src='http://www.yourjavascript.com/131890410571/RoyalTutortagcloud.js' type='text/javascript'/>
<div id='flashcontent'>Blogumulus by <a href='http://www.roytanck.com/'>Roy Tanck</a> and <a href='http://www.bloggerbuster.com'>Amanda Fazani</a> via <a href='http://www.royaltutor.net'>Royal Tutor</a></div>
<script type='text/javascript'>
var so = new SWFObject(&quot;http://files.main.bloggerstop.net/uploads/3/0/2/5/3025338/tagcloud.swf&quot;, &quot;tagcloud&quot;, &quot;240&quot;, &quot;300&quot;, &quot;7&quot;, &quot;#ffffff&quot;);
// uncomment next line to enable transparency
//so.addParam(&quot;wmode&quot;, &quot;transparent&quot;);
so.addVariable(&quot;tcolor&quot;, &quot;0x333333&quot;);
so.addVariable(&quot;mode&quot;, &quot;tags&quot;);
so.addVariable(&quot;distr&quot;, &quot;true&quot;);
so.addVariable(&quot;tspeed&quot;, &quot;100&quot;);
so.addVariable(&quot;tagcloud&quot;, &quot;<tags><b:loop values='data:labels' var='label'><a expr:href='data:label.url' style='12'><data:label.name/></a></b:loop></tags>&quot;);
so.addParam(&quot;allowScriptAccess&quot;, &quot;always&quot;);
so.write(&quot;flashcontent&quot;);
</script>
<b:include name='quickedit'/>
</div>
</b:includable>
</b:widget>
In this default installation, Blogumus includes the following preset variables:

    * Width is set to 240px

    * Height is set to 300px;

    * Background color is white

    * Test color is grey

    * Font size is “12″

Change height and width
Both of these options can be configured in the following line:
var so = new SWFObject("http://halotemplates.s3.amazonaws.com/wp-cumulus-example/tagcloud.swf", "tagcloud", "240", "300", "7", "#ffffff");
The width is 240px and the height is 300px. These numerical values specify the width and height in pixels, so you can alter these of you prefer.

Change background color
To change the background color, alter the hex value found in this line:
var so = new SWFObject("http://halotemplates.s3.amazonaws.com/wp-cumulus-example/tagcloud.swf", "tagcloud", "240", "300", "7", "#ffffff");
By default, this is set to white(#ffffff), but you can alter this to any value you prefer.

Change the color of text
The tag-links are black by default, though you can change this within the following line using the tcolor value:
so.addVariable("tcolor", "0x333333");
Be aware that "tcolor" is a Flash variable and doesn't include the usual hash symbol of hex color codes. Be sure to only replace the numbers!

To alter the size of tags/links
In the following line of code, the size of the tag links is "12" (proportionate to the size of the widget). You can change this value to a smaller or larger number depending on whether you prefer the links to appear smaller or larger in your widget.
so.addVariable("tagcloud", "<tags><b:loop values='data:labels' var='label'><a expr:href='data:label.url' style='12'><data:label.name/></a></b:loop></tags>");
You can alter this to ensure tags are displayed in a bigger or smaller font if you prefer by changing "12" to a larger or smaller number.

You are done.:)


Thursday, October 14, 2010

How to create blog in blogspot

    Why should you create blog in blogger.com, not in other free blog providers? Actually, there is no “should”, but blogger.com has more advantages than other providers do. One of the advantages is the easiness in operating so that blogger.com is good for the beginners. Other advantages are the freedom in editing and replacing the templates to make the best display, custom domain which means that you can replace the domain with your own but with the blogspot hosting, e.g. yourname.blogspot.com can be changed into yourname.com, but still in the same hosting, i.e. the free blogspot hosting.

  • After registration page open, go to the right bottom of the page where you can change the language to your own to make you easier to understand the instructions, but in this tutorial, I use English for more global targeting. Please login by using your username and password of your gmail (your email account is allowed to use for login to blogger).


  • Click "CREATE A BLOG" button
  •  Enter your Blog Title in the field next to "Blog Title", and your expected blog address in the field next to “Blog address (URL). Need to remember that when you enter your expected blog address, you have to be sure of it as you cannot replace it in the future, except you use Custom Domain facility. Check for the availability. If your expected blog address is not available, replace with your new one and so on until you get it. Then type the character you see next to "Word verification", below blog address point and click CONTINUE for the next steps.

  • Choose a starter template, meaning that you can replace this template in the future and then click CONTINUE.  


  • You will see "Your Blog has been created!" meaning that now you have a blog and you are ready to start Blogging, by clicking "START BLOGGING".  

You will soon be in the post editor, where you can write anything as you may have thought about before. (it is recommended to directly write for your first post to avoid "Blogger Anti-Spam Robot" that can result in your blog locked. For instance, you can write a very short entry if you have not prepared an entry: "Hello World!", and anything else you want. Click "PREVIEW" button to view how your post will be displayed, then click "PUBLISH POST" if you want your entry to be published.


  • Click "View Post" to see your blog. Below is the example of the blog display created
  •  Done

For the first phase, your blog is ready and accessible for public. For next discussions about blogging in blogger are to come.


How To Set Your Blogspot Settings

In this page, I will be discussing what to do in each of the settings areas you see below in the Settings.
  • Login To Blogger Go To > Settings

Some settings in Basic menu:
  • Blog Tools: 
  1. Import blog > this is the facility to import data from your computer (this is usually done when transferring blog). Don’t click it, let it be as it is. 
  2. Export blog > this is the facility to export blog from blogger server to your computer. This facility is also called as Backup blog facility. You are suggested to create blog backup at least once a week. The backup data will be useful and helpful when sometime you want to transfer blogs in blogger, or you also can use it when you want to do a blog migration from blogger to another blog machine such as Wordpress, etc. 
  3. Delete blog > this facility is to delete your blog. Don’t ever click it if you don’t want to delete your blog.

  • Title: Fill out with the title of your blog, e.g. My Music blog
  • Description: Fill out with your blog description, e.g. My Music Blog has a large number of songs that are well organized and can be accessed through an easy search.
  • Add your blog to our listing?: You’re suggested to choose Yes option.
  • Let search engines find your blog?: Choose Yes, so your blog will be indexed by search engines such as Google, Yahoo, and Bing.
  • Show quick editing on your blog?: You may choose Yes or No.
  • Show email post links?: It will be an icon of email with which your visitors can easily email your posts to their friends. Choose Yes, if you want, or No if you don’t want this facility to appear on your blog.
  • Adult contents?: If your blog then will contain anything about adults including in the forms of writing, images, or videos of such as sexy girls, etc, you can choose Yes. However, if your blog then will contain anything to be accessed safely by kids and all ages, you should choose No. NB: If you choose Yes, there will be an adult content warning when your blog is accessed.
  • Select Post Editor: This is to select post editor in your blog. 
  1. Updated Editor > This is the latest post editor that Blogger has with new features included such as the More button to cut off your articles, and more. 
  2. Old Editor > This is the old post editor that Blogger has, but you can still use it if you feel more comfortable with this old editor, because there are some features at this old editor that are not included in the Updated Post Editor. 
  3. Hide Compose Mode > This is an option for those who are familiar with HTML because this option will hide the compose mode in your post editor. Don’t use this option if you are not familiar with the HTML coding.
  • Enable transliteration?: Select Enable if you want your post editor allow you to translate to Hindi, Kannada, Malayalam, Tamil, or Telugu. Select disable if you want your post editor not to allow you the transliteration.
End settings on Basic menu by clicking SAVE SETTINGS.

Publishing

This is to change the domain name of your blog in blogger with your own domain name,
e.g. http://yourblogname.blogspot.com into http://yourblogname.com.

For temporary, don’t do anything at this Publishing menu! Leave it alone.

Formatting

Some settings in the Formatting menu:

  • Show at most: type the number of posts you want to display on your blog homepage, e.g. 5. Next to number of posts option, there is dropdown menu allow you to choose Posts or Days. Just choose posts, which means your blog homepage will show 5 posts.
  • Date Header Format: Choose how the date format you would like to display above your posts.
  • Archive Index Date Format: Choose the date format for your archive index.
  • Timestamp Format: Choose the time format you would like to display. This is the time when a post is published on your blog.
  • Time Zone: Just choose the time zone where you are.
  • Language: Choose the language you want to use in your blog.
  • Convert line breaks: this is the facility of automated line breaks when you hit enter during typing an article in the post editor. This facility is used when you think you will not post or write the codes such as HTML codes, etc in the future. But if you think you will post about HTML codes and include the codes in your posts, you should choose No, for instance, if your blog talks about the tutorials about HTML, PHP, etc.
  • Show Title Field: You may choose Yes or No.
  • Show link fields: You may choose Yes or No.
  • Enable Float alignment: Choose Yes, so you can arrange the position of your post both images and texts. But if you think this option will disturb the display of your blog, just choose No.
  • Post Template: This is the facility to create any text or code to appear each time you write a new post. It is usually used to create blog signature that will always appear in every post you create without having to type manually each time you create a new post.
End the settings on Formatting menu by clicking SAVE SETTINGS

Comments

Some settings in the Comments menu:

  • Comments: Choose Show if you want your posts commented by your visitors, or choose Hide if you don’t want your posts commented by your visitors.
  • Who can comment? : 
  1. Anyone – includes anonymous users  > choose this option if you want everyone can comment on your blog including the Anonymous users or those without identity. 
  2. Registered users –includes OpenID > Only users that are registered who can comment on your blog, i.e. those who have accounts in Google, Live Journal, Wordpress, Type pad, AIM, and or OpenID. 
  3. Users with Google accounts > Those who can comment on your blog are those who have Google accounts. 
  4. Only members of this blog > Only members of your blog who can comment. A certain community usually chooses this option such as educational community, etc.
  • Comment form placement: 
  1. Full page > the page of your blog will switch to the comment form page if you choose this option. 
  2. Pop-up window > your comment box will appear as pop-up window, so your blog is still displayed. 
  3. Embedded below post > your comment box will directly be displayed under post, so your visitors can comment directly without clicking a Post Comment link. Bloggers like most the comment box is embedded below post.
  • Comments Default for posts: Choose New posts Have Comments if you want your articles have the comment box, but you can disable this when you create a post. Choose New Posts Do not have comments if you want your posts don’t have comment box, but you can add it when you create a post.
  • Backlinks: Choose Show if you want to display links to the websites that link to your articles.
  • Backlinks Default for Posts: choose New posts have backlinks if you want your articles have backlinks, and choose new posts do not have backlinks if you want your articles do not have backlinks.
  • Comment Timestamp Format: choose the date format you want to display.
  • Comment Form Message: type your massages to be displayed above the comment box, e.g. please comment freely but keep it polite by not doing spam.
  • Comment Moderation: choose Always if you want to display any comment after moderation. Only on posts older than …days. Choose this option if you want to display any comment on your selected posts based on the age you have determined, e.g. 15 days, etc. Choose Never if you want to display any comment without a moderation. Don’t forget to type your email address in the available field to get notifications when someone of non-member comments on your posts. Or leave blank if you don’t need the notifications.
  • Show word verification for comments?: choose Yes if you want to display word verification that will require commentators to enter before publishing their comments. It is to avoid a spam comment such as the robot spam script that can comment on your automatically and frequently. Anyway, visitors usually don’t like the word verification for inconvenience reason. Choose No when you don’t want the word verification displayed, although this option allows spasm like robot spam scripts to place their comments.
  • Show profile images on comments?: Choose Yes if you want the profile images of commentators to be displayed, and choose No if otherwise.
  • Comment Notification Email: Enter the email addresses up to ten emails that you want to send comment notifications.
End settings on Comment menu by clicking SAVE SETTINGS.

Archiving

Some settings on Archiving menu:

  • Archive frequency: choose how your blog archives will be displayed on your blog whether you want the archives arranged No Archive, Daily, Weekly, or Monthly. You had better choose Monthly.
  • Enable Post Pages?: Choose Yes or No.
End settings on Archiving menu by clicking SAVE SETTINGS.

Site Feed

Some settings on Site Feed menu:

  • Allow Blog Feeds: Choose either None, Short, or Full. You had better Full at this option.
  • Post Feed Redirect URL: If you have burned your post feed, you can type the URL of your feed here, for instance, you can burned post feed at Feedburner, etc. Leave it blank if you don’t have. We will specifically discuss about Feed burner at next post.
  • Post Feed Footer: You can fill any code here that will be displayed in the footer of your post feed such as advertisements, etc. Leave it blank if you don’t understand.
End settings on Site Feed menu by clicking SAVE SETTINGS.

Email & Mobile

In order to be able to post an article on your blog, not only do you use the post editor, but you also have other ways, e.g. through email and mobile.

Some setting on Email & Mobile menu:

BlogSend Address: Type email addresses up to ten emails separated by comma (,) to which you want to send notification when posting an article.

Email Posting Address: Create a blogger email address (known as Mail2Blogger) from which you can post articles directly to your blog when you send an email to this blogger email address, e.g. if you have an email address at example@gmail.com, then you can create blogger email address at example.post@blogger.com or example.blog@blogger.com, or anything else you think very good, but you should remember that it’s a secret to avoid other people can post through it.

To activate this feature, you should choose Publish emails immediately, meaning that each time you send emails to your blogger email address, the content of your email will be posted as blog post on your blog. If you choose Save emails as draft posts, the emails will not be published automatically but will be stored in the draft posts.

However, if you don’t want to publish through email, choose Disable. For security reason, many choose this option.

End settings on Email & Mobile menu by clicking SAVE SETTINGS

OpenID

Nothing to do some settings here, but there is notification telling you that your blog address can be used as the address of OpenID. What is OpenID? Maybe we will discuss later.

Permissions

On this menu, you can add Authors by inviting them. Just write the email addresses you want them to be the authors of your blog.

At Who can view this blog?, you can choose who can view your blog. If you choose Anybody, your blog can be viewed by public or anybody. If you choose Only people I choose, only invited people who can view your blog that they should login first to view. If you choose Only blog authors, only your blog authors who can view your blog. If you think your blog is not worth publishing as you conduct maintenance, for instance, you can use this option, so only you that can view the blog.


Tuesday, October 12, 2010

How to Change the Date of a Blog Post in Blogger


Login To Blogger Go To > Settings > Formatting.

Choose a format in which you intend the date to be displayed from among a number of formats (Only numerals, Combination of numerals and words etc.).


Recent Posts

Followers

Recent Comments